Add Booking Details Wizard
-
Booking details are also called categories.
-
Booking detail items, also called resources, are the individual items (coffee, sandwich, projector, and so on) that you add to a booking detail.
-
A booking detail might include a service order.
If your booking template is designed so you can add details such as catering, audio/video equipment, or housekeeping to a meeting, you will see fields for these options in the details screens for the booking.
To add services, equipment, and other resources to an existing meeting:
-
Navigate to the event.
-
Add services and so on to the event.
-
Save your changes and send notifications.
-
(If the request requires approval) Follow up on your service order request.
-
Open the reservation.
Learn about Booking Details and Items Overview.
-
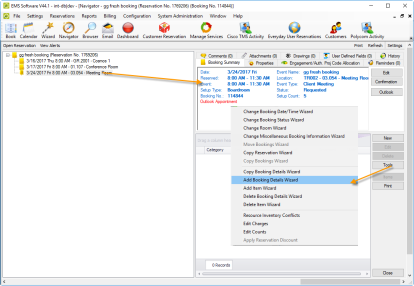
Focus the Navigator on the booking within that reservation for which you want to add services, equipment, etc., and click Tools, then select Add Booking Details Wizard. Your Administrator might have relabeled this option. If it does appear, services are not allowed for this type of booking.
-
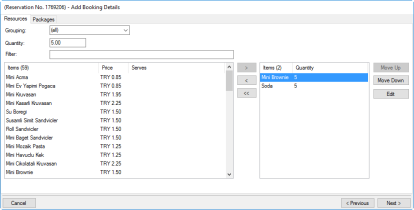
Add a Service order: In the Add Booking Details window that opens, select a category of service or equipment. The fields on the right pane change depending on the selection you make.
-
Complete the fields in the right pane, then click Next.
EMS Desktop Client advances you through the information you must enter to complete the service order. Tabs and fields that display to you vary depending on how the type of service is configured for your organization. The example below shows a catering service order that is defined to allow you to add menu items; two have been added to the right pane which indicates menu items to be included with the order (in this case, for 5 servings). The same type of window displays for other types of services such as equipment. The only difference is that the items might be human activities.
To add notes and other details to each menu item select it and click Edit. To save, click OK.
If a cost is associated with an item, cost related fields will appear similar to those shown above. If you are authorized, you can change them (for example, to apply a discount). Learn about Apply or Update Pricing Plans.
-
Once you have finished selecting items for the service order, click Next.

-
Select the booking(s) for which you want to add the service order and then click Finish.
-
On the confirmation dialog, click Yes to add more service orders, or No to finalize the service order.
The new service order appears in the Navigator. If the service order requires an approval workflow, the state of the request shows in the State column.

To see and work with the items (resources) requested for a service order, select it in the lower right pane above and then click the Items button.
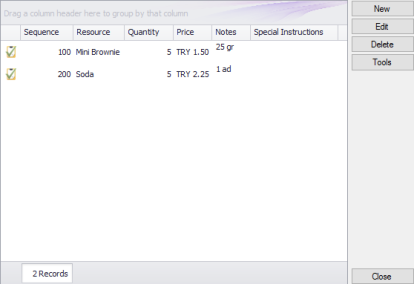
You can click the buttons on the right to add or change items in the list.
To add more items within this service category, click New. This example shows catering fields.
To finalize the new item, click OK.

Once a service order has been added to a booking and you click to expand the order in the left pane, information in both the upper and lower right pane changes to show detail about that specific service order. The following four tabs show in the Navigator in the upper right pane:
-
User Defined Fields – Displays the additional fields that store custom data for the booking detail. Your EMS administrator configures the types of fields that are available as well as the allowed values for these fields. See Working with User Defined Fields in the Navigator.
-
Reminders – Displays any reminders that were created for the selected booking detail.
-
Comments – Displays any comments that were made for the selected booking detail.
-
History – Displays the history for the booking detail (the date that a change was made to the detail, the ID of the user who made the change, the field that was changed, the old field value, and the new field value).
Also, service order items for the selected booking detail show in the Items pane in the lower right pane. A green check mark appears in front of each individual item that has been added to a booking. If the item is a package, then a green checkmark is displayed not only in front of the package, but also, in front of each individual item in the package. A red "X" is displayed in front of any booking detail and/or booking detail item that has been deleted from a booking.
If you click on a booking details item in the left pane of the Navigator, then the entire right pane of the Navigator is refreshed with three tabs: a Properties tab that displays for the selected item, a Selections tab that displays the selections for the booking detail item (if applicable), and a History tab that details the history of the item.