Install and Upgrade the EMS Kiosk
This topic provides you with the instructions to install or upgrade EMS Kiosk app.
 Install or upgrade EMS Kiosk
-
Verify that the System Requirements and Prerequisites for EMS Kiosk App are fulfilled:
-
Patches
-
API
-
.NET Core Windows Server Hosting Bundle:
-
Run the installer.
-
When complete, open a CMD prompt as an Admin.
-
Right-click the Start button and select Command Prompt (admin).
-
Type net stop was /y <enter>.
-
Type net start w3svc <enter>.
-
-
EMS Platform Services
-
We recommend that you test that Platform Services is properly installed by navigating to the URL it created on install (http://localhost/EmsPlatform).
-
To ensure Platform Services is working correctly, connect to http://localhost/EmsPlatform/admin and use an Admin Everyday User to verify you can log in. If you see license information, everything is working properly.
-
-
-
Uninstall old versions of EMS Kiosk App.
We recommend that you record the IIS server, the SQL server name, the EMS DB name, etc. We also recommend creating a notepad file for the URLs that are generated for later reference.
-
Get the latest version of the installation files from the Downloads area in Accruent Access.
To view the Downloads area,
-
Load the EMS.Kiosk.App.msi file onto the web server that will be running the EMS Kiosk App.
-
Run EMS.Kiosk.App.msi.
-
The first screen welcomes you to the EMS Kiosk Setup Wizard. Click Next to begin the installation process.
-
The Destination Folder screen appears.
The default install folder for the EMS Kiosk App is in C:\Program Files. You can change the location of the default installation folder.
EMS Kiosk App should not be installed in the same physical directory as other EMS web-based products OR under a site running another version of the EMS Kiosk App.
-
On the EMS Application Settings page, enter the Platform API URL and the Virtual Directory Name.
-
Enter your EMS Kiosk App path and click Next. The Virtual Directory screen appears.
-
Enter the virtual directory name. Click Next. The Ready to Install screen appears.
-
To install EMS Kiosk App, on the EMS Kiosk Setup window, click Install.
- Navigate to C:\Program Files\EMS Software\EMSKiosk.
-
Open the appsettings.json file in Notepad.
-
Search for the section, "Platform Options." DO NOT EDIT ANYTHING except the next steps. If there are multiple (load balanced) nodes, you need to apply the Client Secret to all of them.
-
Add a new line below the first { and then type:
"SecureCookies": false,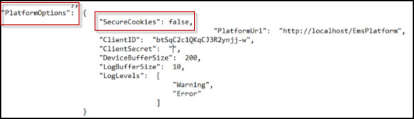
-
Navigate to your Platform Services URL and log-in.
-
Click Integrations.
-
Select the EMS Kiosk service.
-
Copy the Client ID.
-
In your notepad file, replace the Client ID area between the quotation marks. Do not delete the commas.

-
-
Reset the client secret in the EMS Platform Admin UI:
-
Visit the Admin UI for you EMS Platform Services install (e.g., https://my-company.com/EmsPlatform/admin). You will need a Web User login with Administrative permissions to perform this step.
-
Click the Reset Secret button.
-
A new Client Secret is generated following the reset.
-
Copy the generated Client Secret after successful reset. You won't be able to retrieve this secret later. Instead, reset the secret again to generate a new secret.
-
In your notepad file, replace the blank area between the QUOTES “” of ClientSecret with this code. Ensure that the quotations remain before and after the ClientSecret and that there are no spaces.

Sample ClientSecret Value
-
-
Save and close the file. Overwrite the existing appsettings.json file. Ensure your overwrite worked by checking the date (your file should reflect the current date and time.)
-
Reboot your server. Conversely, you could:
-
Open a CMD prompt as admin.
-
Type: net stop was /y <enter>
-
Type: net start w3svc <enter>
-
-
Clear the temp cache by closing your EMS Kiosk App browser window.
-
Return to the EMS Platform Admin and set the Active, Enable Logging, and User Auth to CHECKED.
-
Click Save.

Configure EMS Kiosk using SameSite cookies
In appsettings.json, set either SameSite=Lax, SameSite=Strict, or SameSite=None. SameSite=Lax is the default setting.
If you set SameSite=None, to set the Secure attribute to "True".