View Your Reservations and Check Into the EMS Kiosk App
This topic will provide instructions for the following tasks:
View Information
The Information page is customizable and displays links to additional information that your organization has made available to EMS Kiosk App users.
- To view specific information, click the Information icon at the top of the page.
The Information window opens and usually includes information like Local, Restaurant, and Sight Information.

-
Click Close.
The Main Menu displays.
View and Check in to an Event
- To view your current reservations or check in to your workspace or meeting, click My Reservations.
The sign in page opens. Depending on how your EMS Kiosk is configured, you might be required to enter a personnel number or employee ID instead of a user name.
-
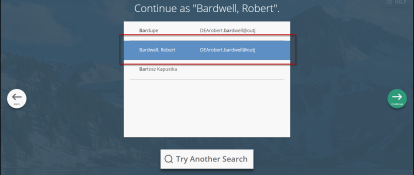
In search, enter a user/group or personnel number and click Search.
A list of all groups/people that meet your search criteria displays. The search is limited to the exact order of the characters in the string, but the string can be found anywhere in the search results and is not case sensitive.
- Click your name in the search results.
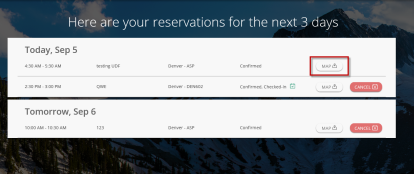
- After successfully logging in, you will see reservations for which you are the host.
Your administrator controls how many days of reservations you can see. The administrator also controls whether you can end an ongoing reservation, or cancel a future one.
- You will also be automatically checked into your meetings/workspaces that are eligible for check in and that are in your building (e.g., if you are located in the Denver office, you will be checked into your Denver meetings only).
Learn about EMS Kiosk App Options.
The following options may also be available on this page:
- View the event on a floor map.
- End an in-progress event early by clicking the End Now icon for the event.
- Cancel an event if you are not going to use the reserved space for the event by clicking the Cancel icon for the event.
View Floor Maps
- To view a floor plan of a building in which you have a scheduled event, find your event on the My Reservations page.
-
Click the Map icon for the event.
The Floor Map dialog opens.
- Click on the Available Room icon (typically a green icon) to view information about the room.
- To return to the My Reservations page after viewing a floor map, click Close in the upper-right corner of the Floor Map dialog.