Install or Upgrade the EMS Web App
-
Manually uninstall previous versions of Virtual EMS (VEMS) or EMS Web App on your web server.
-
Verify that Requirements and Prerequisites have been met.
EMS Platform Services is a prerequisite for installing and using the EMS Web App. If EMS Platform Services is not installed in your environment, validate the hardware and software requirements for EMS Platform Services.
If your organization uses EMS Kiosk App, Google Integration, EMS for Outlook, or SAML authentication, then EMS Platform Services is already running in your environment.
-
Download the EMSWebApplication.msi file onto the web server that will be running EMS Web App.
-
Run EMSWebApplication.msi.
The Welcome page opens.
-
Click Next to begin the installation process.
-
In the Destination Folder page, select the destination folder.
The installation process creates a new physical directory on your web server based on the destination folder path you entered. Click Next.
If you choose a folder above other than the default, a new physical directory on your web server gets created at that location. If your organization uses Internet Information Services (IIS), make sure that the user account used for IIS (IUSR and/or IIS_IUSRS) has access to this new installation directory. To learn more, see Windows Server 2008/2008 R2 Web Server Setup Guide or Windows Server 2012/2012 R2 Web Server Setup Guide.
EMS Web App should not be installed in the same physical directory as other EMS web-based products OR under a site running another version of VEMS or EMS Web App.
-
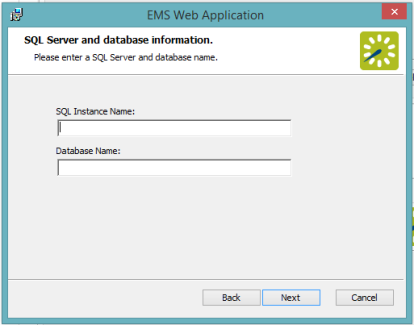
In the SQL Server and database information page that opens, enter your SQL Instance Name and Database Name and click Next.
The database name is typically “EMS.”
-
In the Virtual Directory information page, the Virtual Directory Name defaults to the destination folder you specified (in Step 6 above). We recommend that you keep the default setting. The installation process creates a virtual directory on your web server based on the virtual directory entered (“EmsWebApp” in the example above). Click Next.
EMS Web App should not be installed in the same virtual directory as other EMS web-based products OR under a site running another version of EMS Web App.
-
On the Ready to install EMS Web Application page, click Install.
-
On the Completed the EMS Web App Setup Wizard page click Finish.
-
EMS Platform Services is required. Ensure that EMS Web App is connected to EMS Platform Services as follows:
-
Navigate to the EMS Platform Services Admin Portal.
-
Select Integrations.
-
Under Clients, click the EMS Web App link.
-
Click Reset Secret and copy the generated Secret.
-
In the web.config file located in the designated folder for your current version of EMS, insert the copied Secret ID into the value field.
<add key="platformServicesSecret" value="YourSecretID" />
Important!EMS Cloud Services customers do not need to generate a Secret or insert it into the web.config file (Steps
-
In the EMS Desktop Client, navigate to System Administration > Settings > Parameters > Everyday User Applications.
-
Configure the Platform Services API URL parameter and click Close.
-