Configure the EMS RoomWizard Interface
Establishing a connection between a RoomWizard unit and its associated room in an EMS database is comprised of multiple steps involving the EMS-RoomWizard Interface site and the RoomWizard Setup site.
This topic provides information about the following:
Configuration Overview
After you install and register the EMS-RoomWizard Interface site, you must create connections between your RoomWizard unit(s) and the EMS databases with which they will communicate. This also includes the process of setting various configuration options (statuses, reservation defaults, etc.) per EMS database.
Once a connection to an EMS database has been established/configured, specific EMS rooms containing a RoomWizard unit must be identified. A RoomWizard Room ID is generated for each specific room identified. This ID is required when configuring a room’s RoomWizard device to communicate to that room in the EMS database.
The final step is to configure RoomWizard itself via the RoomWizard Setup site. This includes providing a URL to the EMS-RoomWizard Interface, specifying the Room ID generated above, and configuring various Front Panel settings (e.g. display Host name, enable Start button, etc.).
Configure EMS Database Settings
- Open a browser, and launch EMS-Room-Wizard.
- Click the Configure EMS Databases link.
- To add/configure a new EMS database, enter the database name in Add New EMS Database Name and click Validate.
- To edit settings for an EMS database that was previously added, select the database in Select Existing EMS Database.
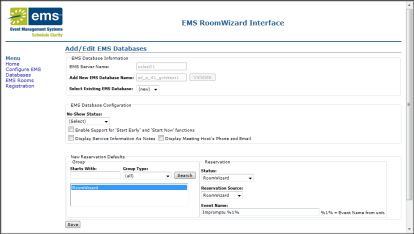
- In the EMS Database Configuration section, configure the following:
- No-Show Status – RoomWizard ‘Start Now’ function must be activated. If enabled, a user’s booking will be canceled (i.e. set to the status specified here) if the RoomWizard unit’s Start button has not been pushed within a configurable amount of time. See EMS – RoomWizard Functionality Overview for more information.
- Enable Support for ‘Start Early’ and ‘Start Now’ functions – Only check this setting if you are using the RoomWizard Start Early and/or Start Now feature. See EMS – RoomWizard Functionality Overview for more information.
- Display Service Information as Notes – If enabled, EMS service orders will display in the Notes area under the meeting Details section.
- Display Meeting Host’s Phone and Email – RoomWizard must be configured to display host information. See EMS – RoomWizard Functionality Overview for more information.
- The New Reservation Defaults section requires the RoomWizard ‘Use Now’ function to be activated. See EMS – RoomWizard Functionality Overview for more information.
- Group – EMS Group used to book a new reservation in the EMS database. To search for a specific Group, enter a value in the Starts With field and click the Search button. For newer generation RoomWizard devices, if a user enters information into the First and Last Name fields on the RoomWizard device, a temporary contact will be created for the reservation under the Group specified in this section.
- Status – EMS Status used to book a new reservation.
- Reservation Source – EMS Reservation Source used to book a new reservation.
- Event Name – EMS Event Name used to book a new reservation. For newer generation RoomWizard devices, to pass-through the event name inputted on the device directly by the user, use the %1% variable.
- To save your settings, click Update.
Configure EMS Rooms
- Click the EMS Rooms link.
A list of previously added Rooms displays.
- To add an EMS Room, click Add Room.
- Select the EMS Database Name.
- Select the Building and Room.
- Click the Save Room Button.
The RoomWizard Room ID field generates a RoomWizard Room ID.
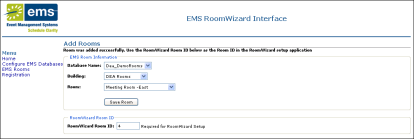
- Repeat Step 4 and Step 5 to add more rooms.
- Click the EMS Rooms link when finished to view your list of rooms.